Chapter 6 Building a Hash Table
Contents
What we’ll cover
So far we’ve been using the Ruby Hash class as the main storage mechanism for the key/value pairs received through the SET command. We also use it for the secondary dictionary necessary to implement the TTL related options of the SET command. We store the expiration timestamp of keys with TTLs, which allows us to know whether a key is expired or not.
Redis is written in C, which does not provide a collection similar to Ruby’s Hash. In C, you only get one collection out of the box, arrays.
Redis implements its own dictionary collection, in dict.c. Because the dictionary data structure is so central to how Redis functions, we will replace the use of the Ruby Hash class with a Dict class we will build from scratch.
We will also add the DEL command, the ability to delete keys is really important to Redis. Having the DEL command will also allow us to easily play with our Dict class to make sure that it handles deletion operations correctly.
We are not adding any new features in this chapter, beside the DEL command, we’re rewriting a key part of the system with lower level elements. Given that Redis’ dict data structure relies on arrays, we will still use the Ruby Array class. We could have reimplemented the Array class, and you’ll find an example in Appendix A, but arrays in C are not specific to Redis. On the other hand, the structure defined in dict.c is.
Let’s get to it.
Maps, Dictionaries, Associative Arrays
This chapter covers hash tables, which is one way of implementing a data structure commonly called Map, Dictionary or Associative Array. I will use the term “Dictionary” as I find that “Map” can be confusing, especially when working with languages providing a map function/method, such as Ruby! From my experience the term associative array, while very explicit, is not as common.
The basic definition of such data structure is one that holds zero or more key/value pairs, where a key cannot appear more than once.
A key operation (pun intended!) of a dictionary is the ability to retrieve a value given a key. The returned value is either empty if no element with such keys exists in the map, or the value mapped to the key if it exists.
Some definitions also include the ability to add, update or delete key/value pairs, which is not provided in immutable versions, where such operations would result in the creation of a new dictionary. The immutable versions will implement similar operations returning a new structure instead of modifying it.
There are multiple ways of implementing a data structure providing these operations. A naive and fairly inefficient version could be to use an array where each element is a key value pair:
def set(map, key, value)
  map.each do |pair|
    pair_key = pair[0]
    # Override the value if the key is already present
    if key == pair_key
      pair[1] = value
      return pair
    end
  end
  pair = [key, value]
  map << pair
  pair
end

def lookup(map, key)
  map.each do |pair_key, pair_value|
    return pair_value if key == pair_key
  end
  return
end
listing 6.1: A basic dictionary using an array
Given these functions, set & lookup, we could use them with an array:
map = []
set(map, "key-1", "value-1") # => ["key-1", "value-1"]
set(map, "key-2", "value-2") # => ["key-2", "value-2"]
set(map, "key-2", "value-3") # => ["key-2", "value-3"]

lookup(map, "key-1") # => "value-1"
lookup(map, "key-2") # => "value-2"
lookup(map, "key-3") # => nil
This approach works from an API standpoint, but it would show performance issues as we keep adding elements to the array. Because we must prevent duplicated keys, we need to iterate through the whole array every time we attempt to add a new pair if the key is not already present. This set implementation is an O(n) operation, where n is the number of pairs in the dictionary. The amount of time required to add an element is proportional to the size of the collection.
A lookup might not always require a complete scan of the array, if we’re lucky and find the key before the end, but it might, in the worst case scenario. The lookup operation is therefore also an O(n) operation.
For Redis, which should be able to handle hundreds of thousand of keys, even millions, and potentially billions, these performance issues are not acceptable.
One common implementation that addresses these performance issues is a hash table. Another possible implementation is a tree map, which uses a tree structure to store elements. For instance, the Java TreeMap class uses a Red-Black tree to maintain the underlying tree balanced. One of the benefits of a tree map compared to a hash table is that it stores elements in order, whereas a hash table does not.
In the next section we will learn how hash tables implement these operations in a more time efficient manner.
Before moving on and abandoning this implementation, it’s really important to note that while this implementation would not perform well with large collections, it might actually be one of the most efficient options for very small collections, such as with one or two pairs, thanks to its simplicity. If the array is small, finding an element requires very few steps and little memory overhead.
As a matter of fact, the Scala standard library does something similar for dictionaries with up to four pairs, it has special case classes meant to handle these fixed sized dictionaries, allowing them to be really fast as there’s no need for hashing or anything else.
Hash Tables
Hash tables are available in many programming languages as part of their standard libraries. Python has dict, Java has HashMap, Scala has Map, Elixir has Map, Rust has HashMap, Ruby’s Hash class is a hash table implementation too. You get it, they’re almost everywhere.
Hash tables can be implemented in different ways, the wikipedia article shows a few different examples. The one we’ll explore in this chapter uses a collision resolution called separate chaining. But why do we need collision resolution? To answer this we first need to look at the central element of a hash table, its hash function.
A hash function must obey a few properties, one of the most important ones being determinism, in other words, identical inputs should result in identical outputs. To explain why, let’s look at how the hashing function is used through a pseudo code implementation of a hash table:
function new_node(key, value, next_node)
    return Node(key, value, next_node)

function update_node(node, new_value)
    return Node(node.key, new_value)

function create_hash_table()
    table = allocate_array_of_arbitrary_initial_size()
    return table

function add_or_update_key_value_pair(table, key, value)
    hash = hash_function(key)
    index = hash % table.size
    node = table[index]
    if node == null
        table[index] = new_node(key, value, null)
    else
        while node != null && node.key != key
            node = node.next_node

        if node.nil?
            existing_node = table[index]
            table[index] = new_node(key, value, existing_node)
        else
            update_node(node, value)

function lookup_key(table, key)
    hash = hash_function(key)
    index = hash % table.size
    if table[index] == null
        return null
    else
        node = table[index]
        while node != null
            if node.key == key
                return key
            else
                node = node.next_node

        return null
listing 6.2: Pseudo-code hash table
The new_node function acts as the entry point of a linked list. A node contains a key, a value, and a next node value. If the next node value is null, the element is the last one in the list.
Prepending - a fancy word for “adding at the beginning” - an element to such list is done by first creating a single node list and then a second one, with the next_node value set to the first one:
node1 = new_node(key1, value1, null)
node2 = new_node(key2, value2, node1)
In this example node1 is a list with a single node, and node2 is a list with two nodes. The first node is the one with the key key2 and the value value2, its next_node value is equal to node1, which has the key key1 and value value1, it does not have a next_node value and is the last element of the list.
update_node works with an existing node and changes its value. It is a useful function when we find an existing pair with a matching key in add_or_update_key_value_pair. We explore this other function in more details below.
create_hash_table does only one thing, it allocates an array of arbitrary size. We purposefully do not define this function here. The size is not really important, as long as it creates a non empty array. The implementation of the allocation is also not really relevant to this example. Most operating systems provide such features, it’s therefore fair to assume that it would use the allocation operations provided by the operating system. malloc is a function in the C standard library that does provide the ability to manually allocate memory.
add_or_update_key_value_pair does more work and let’s walk through it, one line at a time. It takes three parameters, the table we want to insert the pair into, the key and the value.
We first call hash_function with key. We’ll dive deeper into what an implementation of hash_function looks like later, but for now, let’s assume it returns an integer. Because the hash function is unaware of the size of the array, the returned value might be larger than the size of the array.
We use the modulo operation to convert the hash value returned by hash_function into a number between 0 and table.size - 1. We can now use the result of the modulo operation as an index. That’s why we have the create_hash_table function, to make sure that table is initialized with empty slots. These slots are often called buckets in hash table lingo.
If the bucket is empty, then we create a new node, add it to the bucket and we’re done. If the bucket is not empty, then things are more complicated.
There are two distinct cases to consider if there is already an item at the location obtained through the hash function. One of the nodes in the bucket might have the same key, in this case we want to override its value with the new value. This the case where we want to update an element in the array instead of adding it.
The other one is that the nodes already present might all have a different key, in which case we want to keep all the existing nodes and add the new one. This the case where we want to add a new pair, and is called a collision.
Let’s illustrate with an example. Let’s set the initial size of the array to 4, all the buckets are empty:
table = [nil, nil, nil, nil]
Let’s define a hash function, that returns the length of the input string:
function hash_function(string)
    return string.length
If we first call add_or_update_key_value_pair with the key "a" and the value "b", hash_function will return 1, the length of the string "a". 1 % 4 returns 1, so we add the pair at index 1:
table = [nil, Node("a", "b", nil), nil, nil]
Let’s call add_or_update_key_value_pair with the pair "cd"/"e", the length of "cd" is 2, 2 % 4 is 2, we insert the pair at index 2:
table = [nil, Node("a", "b", nil), Node("cd", "e", nil), nil]
Let’s now call add_or_update_key_value_pair with "fg"/"h". The length of "fg” is 2, but there’s already a pair at index 2. Because we want to keep all pairs we need a solution to resolve this collision. There are different strategies available to us here, and the one we’re going to use is called “separate chaining”.
The essence of this strategy is that each bucket contains a linked list of values. So in the previous example, we insert the new element at the beginning of the list at index 2. Note that prepending an element to a linked list is an O(1) operation, it takes the same amount of time regardless of the size of the list. This is the list once the operation is completed:
table = [nil, Node("a", "b", nil), Node("fg", "h", "Node("cd", "e", nil)), nil]
lookup_key is very similar to add_or_update_key_value_pair. We use the same process to find which bucket the key should be in. If the bucket is empty, we return null, the key is not present in the dictionary. On the other hand, if the bucket is not empty, we need to look through the list until we find the node with the key argument.
If we don’t find any, the key is not present in the dictionary.
Trying to avoid collisions
The hash_function we used in the previous works well as an example because of its simplicity but it would not be practical in the real world. To keep hash tables efficient, we want to reduce the number of collisions as much as possible. This is because iterating through the linked list is inefficient, if there are a lot of collisions, it could take a long time to loop through all the items in the bucket.
This is where the uniformity property of a hash function is really important. Uniformity helps reduce the likelihood of collision. In the previous example, if a hypothetical hash function had returned the values 1, 2 & 3, respectively, instead of 1, 2 & 2, there wouldn’t have been any conflicts.
Collisions are also related to the size of the underlying array. Regardless of the uniformity of the hash function, if the underlying array has a size n, storing n + 1 items cannot happen without at least one collision.
One approach would be to start by allocating a very large amount of memory, but this can be wasteful, because there could be a lot of memory allocated, but unused. Many hash table implementation have mechanisms to adjust the size as needed, and it turns out that Redis does this too, as we’ll see in the next section.
A good hash function that provides uniformity means that both operations add/update & lookup have an O(1) time complexity, meaning that the number of steps is always the same regardless of the number of elements already present. We first hash the value, transform it to an index and use the matching bucket.
On the other hand, a bad hash function without uniformity would make these operations O(n). In the absolute worst case scenario, all keys would land in the same bucket, and the number of operations required would depend on the number of elements already present in the linked list in the bucket.
Back to determinism
Now that we know how the result of a hash function is used, that is, it determines the location of a key/value pair in the underlying array, let’s go back to the determinism element of a hash function.
Let’s demonstrate why we need determinism by showing what would happen with a hash function that is not deterministic.
In Ruby, each object is given an object id, in the following examples, the two variables str1 & str2 are different instances, each holding the same value, and are therefore considered equal, but have different object_id values:
str1 = "hello"
str2 = "hello"
str1.object_id # => 180
str2.object_id # => 200
# The object_id values might be different on your machine, they are assigned at runtime
# and will therefore differ if you've created more Ruby objects beforehand for instance
str1 == str2 # => true
Let’s define a wrong hash function, which returns its input’s object_id:
def hash_function(object)
  object.object_id
end
Let’s manually walk through a small example, let’s start by creating a hash table of size 3 and add the pair a-key/a-value to it. Let’s re-use the same object_id from the previous example, and assume that a-key would have returned 180. 180 % 3 = 0, so we insert the new node at index 0:
table = [Node("a-key", "a-value", nil), nil, nil]
And let’s now call the lookup function with a different string holding the same value, and, reusing the previous example data again, assume that its object id is 200, 200 % 3 = 2. The lookup would look at the bucket at index 2, find a nil value and return nil, whereas the table does contain a pair with the key a-key.
A deterministic hash function prevents this.
Common Hash Functions
In order for a hash table implementation to be efficient, it needs a good hash function. Hash functions come in different flavors, as shown on wikipedia:
- Cyclic redundancy checks
- Checksums
- Universal hash function families
- Non-cryptographic
- Keyed cryptographic
- Unkeyed cryptographic
Some of the functions in the “Unkeyed cryptographic hash functions” category are pretty common. MD5 used to be very common to verify the integrity of a file downloaded over the internet. You would download the file, compute the md5 of the file locally and compare it against the md5 published by the author of the file. It is common to see sha256 used instead nowadays. This is what the Downloads page on ruby-lang.org does!
For a long time sha1 was the default algorithm used by git to hash commits and other objects. It now supports multiple algorithms such as sha256. This change was required after researchers proved that it was possible to forge two different inputs resulting in the same sha1 hash.
Redis uses SipHash which is in the “Keyed cryptographic hash functions” category. We will look closer at the SipHash algorithm below.
All Ruby objects implement a hash method, which happens to use the Siphash algorithm, the same algorithm Redis uses!
str1 = "hello"
str2 = "hello"
# Note that the hash value is partially computed from a random value and will therefore be different
# on your machine
# It will also be different if you restart irb
str1.hash # => 2242191710387986831
str2.hash # => 2242191710387986831
Now that we know what a hash function is, how it used to implement a hash table, let’s look at how things work in Redis.
How does Redis do it?
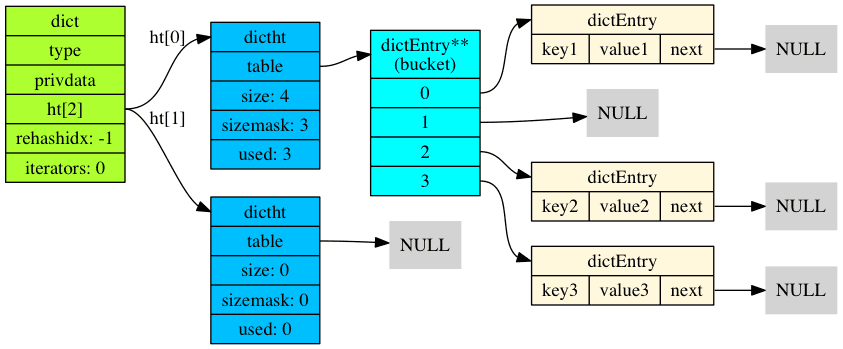
Redis uses three data structures to implement a dictionary, dict, dictht & dictEntry, the following diagram, from wjin.org, shows how they each relate to each other:
It’s important to note that dictionaries are used in multiple places in the Redis codebase, but there are two main ones for each database, the one holding all the top-level key/value pairs, such as the ones added with SET and other commands creating pairs, and the expires dictionary, used to store key TTLs.
If you’re not used to C, don’t worry too much about it for now, we’re not going to look too closely at pointers and other C specific features.
Our implementation supports a single database, but Redis can handle multiple databases. A database in Redis represents a set of key/value pairs it is defined as the following C struct:
typedef struct redisDb {
    dict *dict;                 /* The keyspace for this DB */
    dict *expires;              /* Timeout of keys with a timeout set */
    dict *blocking_keys;        /* Keys with clients waiting for data (BLPOP)*/
    dict *ready_keys;           /* Blocked keys that received a PUSH */
    dict *watched_keys;         /* WATCHED keys for MULTI/EXEC CAS */
    int id;                     /* Database ID */
    long long avg_ttl;          /* Average TTL, just for stats */
    unsigned long expires_cursor; /* Cursor of the active expire cycle. */
    list *defrag_later;         /* List of key names to attempt to defrag one by one, gradually. */
} redisDb;
listing 6.3: The C struct for redisDB defined in dict.c
We will ignore all the fields but the first two for now. We can see that the two fields, dict & expires are both of the same type: dict.
dict is defined in dict.h:
typedef struct dict {
    dictType *type;
    void *privdata;
    dictht ht[2];
    long rehashidx; /* rehashing not in progress if rehashidx == -1 */
    unsigned long iterators; /* number of iterators currently running */
} dict;
listing 6.4: The C struct for dict
Once again, in order to keep things as simple as possible, we will ignore some fields, specifically, privdata & iterators.
The dictType struct is used to configure the behavior of a dict instance, such as using a different hash function for instance. It is defined as:
typedef struct dictType {
    uint64_t (*hashFunction)(const void *key);
    void *(*keyDup)(void *privdata, const void *key);
    void *(*valDup)(void *privdata, const void *obj);
    int (*keyCompare)(void *privdata, const void *key1, const void *key2);
    void (*keyDestructor)(void *privdata, void *key);
    void (*valDestructor)(void *privdata, void *obj);
} dictType;
listing 6.5: The C struct for dictType defined in dict.c
The syntax used in this struct is different because the members are function pointers. That’s about as far as we’ll go with C in this chapter. Redis does this to allow a form of configuration of a dict instance. It has the ability to create two dictionaries with potentially two different hash function implementation. We don’t need this level of flexibility at the moment so we will not implement these features for now.
The most interesting element of the dict struct for us is the dictht array. ht here stands for Hash Table. ht[2] means that the struct member is named ht and is an array of size two. Essentially, each dict instance has two hash tables, ht[0] & ht[1].
dictht is defined as follows:
/* This is our hash table structure. Every dictionary has two of this as we
 * implement incremental rehashing, for the old to the new table. */
typedef struct dictht {
    dictEntry **table;
    unsigned long size;
    unsigned long sizemask;
    unsigned long used;
} dictht;
listing 6.6: The C struct for dictht defined in dict.c
The comment tells us why a dict has two tables, for rehashing. To explain rehashing, we first need to explain the first member of dictht: dictEntry **table. The double star syntax, a pointer to pointer, is not that interesting to us at the moment, it is one way of defining an array of dictEntry with dynamic size, one that can be set at runtime. We then need to look at the dictEntry struct:
typedef struct dictEntry {
    void *key;
    union {
        void *val;
        uint64_t u64;
        int64_t s64;
        double d;
    } v;
    struct dictEntry *next;
} dictEntry;
listing 6.7: The C struct for dictEntry defined in dict.c
dictEntry is a linked list, a common term for a structure like this one is “a node”. It contains a key, key, a value, v and a link to the next element in the list, next.
Because dictEntry **table is an array with a dynamic size, we also need the size member. used is a counter, that starts at 0 and that is incremented when items are added, and decremented when items are removed.
sizemask is an integer value, which is initialized at 0 if size is also 0, but is otherwise always set to size - 1.
To understand the need for the sizemask member, let’s look back at our pseudo code implementation from above. We can see that a very common operation is to use hash_value % array_size. This operation converts a value, potentially larger than the array size, to one that is between 0 and size - 1, allowing us to use the result as an index for the underlying array.
The modulo operation, %, is not that costly, but it does require a few steps, an integer division, followed by a multiplication and a subtraction: c - (c/m*m). Let confirm with an example:
c = 469513
m = 143317
c % m # => 39562
c - (c/m*m) # => 39562
Given how crucial this operation is to the performance of a hash table, every operation relies on it to find the bucket index, it is valuable to attempt to optimize it.
It turns out that if, and only if, the modulus (the second part of the modulo operation, b in a % b, the size of the array in the hash table) is a power of two, then the modulo can be computed in a single operation with the bitwise AND/& operator:
a & (b-1)
Let’s illustrate this with a few examples, if the backing array of the hash table is of size 4, then:
0 % 4 = 0, 0 & 3 = 0
1 % 4 = 1, 1 & 3 = 1
2 % 4 = 2, 2 & 3 = 2
3 % 4 = 3, 3 & 3 = 3
4 % 4 = 0, 4 & 3 = 0
5 % 4 = 1, 5 & 3 = 1
...
It might help to visualize the number as binary, let’s use 4 bit integers for readability. The binary representation of 4 is 0100 and 3 is 0011, so 0 & 3 can be represented as:
 0000
&0011
    =
 0000 (0)
The following shows the visualization of 1 & 3, 2 & 3, 3 & 3, 4 & 3 & 5 & 3.
 0001 (1)  |  0010 (2) |  0011 (3) |  0100 (4) |  0101 (5)
&0011      | &0011     | &0011     | &0011     | &0011
    =      |     =     |     =     |     =     |     =
 0001 (1)  |  0010 (2) |  0011 (3) |  0000 (0) |  0001 (1)
In order to take advantage of this property, Redis always picks a size that is a power of two for the backing array. By setting sizemask to size - 1, Redis can efficiently compute the index of any keys once it obtained its hash value. This is a part of the code for dictFind:
dictEntry *dictFind(dict *d, const void *key)
{
    // ...
    h = dictHashKey(d, key);
    for (table = 0; table <= 1; table++) {
        idx = h & d->ht[table].sizemask;
        he = d->ht[table].table[idx];
        // ...
    }
    return NULL;
}
listing 6.8: excerpt of dictFind
h is the value returned by the hash function and d->ht[table].sizemask is how Redis accesses the sizemask value for its hash table. idx is the index indicating the location of the bucket. Redis then looks into the array to inspect the bucket with he = d->ht[table].table[idx] (he stands for hash entry).
Rehashing
Now that we looked at the data structures that Redis uses to implement its dict type, we need to look at the rehashing process. A new dictionary in Redis is always empty, the backing table, the table member, is set to NULL and the size, sizemask and used members are all set to 0:
// https://github.com/antirez/redis/blob/6.0.0/src/dict.c#L102-L108
static void _dictReset(dictht *ht)
{
    ht->table = NULL;
    ht->size = 0;
    ht->sizemask = 0;
    ht->used = 0;
}

// https://github.com/antirez/redis/blob/6.0.0/src/dict.c#L121-L131
int _dictInit(dict *d, dictType *type,
        void *privDataPtr)
{
    _dictReset(&d->ht[0]);
    _dictReset(&d->ht[1]);
    d->type = type;
    d->privdata = privDataPtr;
    d->rehashidx = -1;
    d->iterators = 0;
    return DICT_OK;
}
listing 6.9: C code for _dictReset & _dictInit
Whenever Redis adds a new key/value pair to a dictionary, it first checks if the dictionary should be expanded. The main reason causing a dict to expand is if the number of items in it, the used member, is greater than or equal to the size of the dict, the size member. This will always be true for an empty dictionary since both are initialized to 0. This will also be true every time the number of items reaches the size of the dict. When the dict is of size 4, once 4 items are added, the next addition will trigger a resize.
This is necessary to limit the likelihood of collisions, because as we discussed, collisions slow down the hash table. If the array contains four buckets and the table needs to store five items, it will at best have one collision. If we resize the array to contain eight buckets, then it is possible to store the five items without any collisions.
As mentioned earlier, in order to take advantage of the “fast modulo for a power of two value through bitwise AND” property, Redis will always choose a power of two for the size. The smallest non empty size is 4, and it will grow through power of twos from there on: 8, 16, 32, 64 and so on. All the way up to LONG_MAX + 1, 9,223,372,036,854,775,808, also written as 9.223372036854776e+18 in the exponential notation. That’s 9.2 billion billions, Yes it’s a huge number!
Why LONG_MAX + 1
Redis uses LONG_MAX + 1 as the maximum value for a dict size. LONG_MAX is a constant defined in the C header file limits.h and is set to 9,223,372,036,854,775,807. We can see that it’s not a power of two by looking at the right most digit, 7, it’s not even, so we already know that it’s not a power of two. All power of two are even numbers since by definition, we obtain them by multiplying 2s.
This big number is a 64-bit integer, where all bits are 1s, except the first one:
0111 1111 1111 1111 1111 1111 1111 1111 1111 1111 1111 1111 1111 1111 1111 1111
The first bit is a 0 because LONG_MAX is a signed integer, that is it can be negative of positive. Signed integers use the first bit to determine the sign, 0 for positive, 1 for negative. The other bound is LONG_MIN, set to -9,223,372,036,854,775,808, which has the following binary representation:
1000 0000 0000 0000 0000 0000 0000 0000 0000 0000 0000 0000 0000 0000 0000 0000
This representation of signed numbers is called Two’s complement, there are other representations but two’s complement is a very common one.
The only larger number that can fit in a 64-bit integer, is the unsigned max value, where all bits, even the first one, are used to encode the integer value, it’s called ULONG_MAX, U stands for usigned here, and is set to: 18,446,744,073,709,551,615, 2^64 - 1 . As we did before, we can see that it’s not a power of two, 5, the last digit, is not even. This is its binary representation, 64 1s:
1111 1111 1111 1111 1111 1111 1111 1111 1111 1111 1111 1111 1111 1111 1111 1111
It means that if we want to use power of two numbers, then the largest one we can get to is 2^63. The max value we can encode in a 64 bit integer is 2^64 - 1, one short, so we have to stop one power of two below, hence setting the upper bound to LONG_MAX + 1, aka, 2^63.
Back in Chapter 4 we talked about Big O notation and time complexity. The bottom line being that since Redis processes incoming commands sequentially, a slow operation would effectively back the queue. You can think of it as someone taking a long time to go through checkout at a grocery store. The longer they take, the more likely it is that the queue of customers waiting in line increases.
Resizing a hash table is essentially an O(n) operation, the time it takes to do it is proportional to n, the number of elements in the hash table. In other words, the more elements in the table, the longer it’ll take to resize it. And as we just saw, Redis hash tables can get big, really big! Forcing all the clients in the queue to wait while we resize the table is far from desirable.
Enter rehashing!
Rehashing is the process Redis uses to incrementally, in small steps, resize the table, while still allowing other operations to be processed, and this is why it uses two hash tables per dictionary. Let’s look at how rehashing works through an example.
Note that resizing the array is technically not necessary to store the items given that each entry in the array, the buckets, are linked lists. This means that even an array of size 4 could store millions and billions of key/value pairs. The problem is that the performance would suffer drastically, iterating through that many items in a linked list would take a very long time. With millions of items, it could easily take multiple seconds.
- The Redis server starts, the main dict is initialized with two hash tables, both empty
- The server receives a SET command, it needs to expand the dictionary.
- It finds the next power of two that will be enough to fit all the elements, it needs to store one element, so it uses the minimum value 4.
- It allocates the main array,
ht[0], with a size of 4, and adds the first key/value pair - The second, third & fourth values are added without any issues.
usedis now set to 4 - A fifth SET command is received, Redis decides to resize the dict.
- The resize process allocates a new table, big enough to store all the items, for which the size is a power of two. It selects the next power of two, 8.
- The new table is assigned to the secondary table, the rehashing one,
ht[1] - The dict is now a rehashing state. In this state, all new keys are added to the rehashing table.
- The dict has now 2 tables, where 4 keys are in the first table and 1 is in the second one.
- While in this state, many operations, such as key lookups will look at both tables. For instance a GET command will first look at the first table, and if it doesn’t find the item, will look at the rehashing table, and only if the items can’t be find in either table, will return NULL.
- While in rehashing state, many commands, such as key lookups or key additions, will perform a single step of rehashing. The
server_crontime event we looked at in Chapter 3 also attempts to rehash dictionaries that needs to. - The rehashing process starts at index 0, looks at the first table, and if it finds an item, moves it to the second table. It then moves to index 1, until it iterated through the entire table
- Once it’s done, it makes the rehashing table the primary, resets the rehashing table to an empty table and exits the rehashing state
This process allows Redis to resize dictionaries in small steps, while not preventing clients to send commands in the meantime.
Rehashing is also used to reduce the size of a dictionary. If the number of keys, the used member, goes below 1/10th of the size value, that is, only 10% of the dictionary is used, Redis will try to find a better size to fit the keys. That is, it will find the smallest power of two that is greater than or equal to used.
This is also performed in server_cron, as a time event and prevents Redis from unnecessarily using memory.
If you want to dig deeper in the Redis implementation, here are few interesting functions you can start with:
The SipHash hash function
The last thing we need to look at before building our own hash table is the hash function. Redis has been using the SipHash algorithm since version 5.0. Before that it had been using the MurmurHash2 algorithm as of version 2.5. And before that, it used a simple version from Dan Bernstein called djb2.
The SipHash algorithm is described in this paper: SipHash: a fast short-input PRF paper.
One of the benefits of SipHash is that it offers strong protection against attacks such as hash flooding.
The implementation of the SipHash algorithm is quite complicated. The one used by Redis is in the siphash.c file and a Ruby implementation is provided in Appendix B. What is important to note is that Siphash requires a key, usually coming from random bytes, to compute a hash value.
This means that unlike md5 or sha1, which always return the same value for the same input, siphash will return the same value, if, and only if, the key is the same.
This is essentially a simplified explanation of how the hash flooding protection works. If Redis were to use md5 as its hashing function, I could try to guess what the hash value used to compute the index would be. Let’s see that with an example:
The md5 hash for the string a is the string 0cc175b9c0f1b6a831c399e269772661:
Digest::MD5.hexdigest("a") # => 0cc175b9c0f1b6a831c399e269772661
The result is a 32 character string representing a 128-bit (16 bytes) result. Because most CPUs use 64-bit integers as their largest types, the result we just saw is actually the hex representation of two 64 bit integers. Let’s illustrate this with the pack and unpack method.
The string is a hex string, so we need to look at each pair of characters. We call hex on each pair, which returns the integer value. For instance '00'.hex returns 0, 'ff'.hex returns 255, the maximum value of an 8-bit integer - a byte. We then call .pack('c16') which returns a string representing all the bits concatenated together. We use 'c16' because the result of .map(&:hex) is an array of 16 bytes.
Finally .unpack('QQ') looks at the string of bytes and tries to convert to two 64 bit integers. We use 'QQ', which is identical to 'Q2', because a string of 16 bytes can be unpacked to two 64-bit integer. One 64-bit integer is composed of 8 bytes - a byte contains 8 bits, so 8 bytes contain 64 bits - so 16 bytes can be unpacked to two 64-bit integers.
bytes = "0cc175b9c0f1b6a831c399e269772661".scan(/../).map(&:hex).pack('c16') # => "\f\xC1u\xB9\xC0\xF1\xB6\xA81\xC3\x99\xE2iw&a"
bytes.unpack("QQ") # => [12157170054180749580, 7000413967451013937]
The previous code was adapted from this blog post
A simpler example might help illustrate this:
"ffff0000ffff0000ffff0000ffff0000".scan(/../).map(&:hex)
=> [255, 255, 0, 0, 255, 255, 0, 0, 255, 255, 0, 0, 255, 255, 0, 0]

[255, 255, 0, 0, 255, 255, 0, 0, 255, 255, 0, 0, 255, 255, 0, 0].pack('c16')
=> "\xFF\xFF\x00\x00\xFF\xFF\x00\x00\xFF\xFF\x00\x00\xFF\xFF\x00\x00"

"\xFF\xFF\x00\x00\xFF\xFF\x00\x00\xFF\xFF\x00\x00\xFF\xFF\x00\x00".unpack('QQ')
=> [281470681808895, 281470681808895]
We can play with pack and unpack a little bit more to confirm that these two 64-bit integers we got are the two elements of the md5 result:
[12157170054180749580].pack("Q").unpack("H16")
=> ["0cc175b9c0f1b6a8"]
[7000413967451013937].pack("Q").unpack("H16")
=> ["31c399e269772661"]
12157170054180749580 represents the first 64 bits of the md5 value, by calling .pack('Q') we convert it to a string representing all these bits back to back, and convert it back to a string of 16 hex characters with .unpack('H16'). We can confirm that 0cc175b9c0f1b6a is the first half of 0cc175b9c0f1b6a831c399e269772661 and that 31c399e269772661 is the second half.
We can also look at the actual 64 bits with unpack('B64')
[12157170054180749580].pack('Q').unpack('B64')
=> ["0000110011000001011101011011100111000000111100011011011010101000"]
[7000413967451013937].pack('Q').unpack('B64')
=> ["0011000111000011100110011110001001101001011101110010011001100001"]
Back to our hypothetical use of md5 as a hash function in Redis. Given that we would only use a single integer to apply the modulo to, we could pick either the first one or last one, let’s arbitrarily pick the second one, just because.
If I sent the command SET a-key a-value, the hash value of a-key is the 64 bit integer 7000413967451013937. This knowledge can be used to forge special requests and maximize the chances of collisions, potentially causing performance issues to the hash table.
With a keyed algorithm such as Siphash, it’s impossible to infer what the hash value would be if the server uses random bytes as the key. We can demonstrate this with Ruby, which also uses Siphash by running "a".hash in an irb shell, closing and reopening irb, the hash value will be different. This is because Ruby initializes random bytes at startup that it then uses to compute siphash values.
Siphash was added to Redis in this commit. SipHash returns a 64 bit integer, so we can use the value directly instead of going trough all the steps we had to go through with md5.
Our own Dict class
Dict, HashTable & DictEntry
We previously looked at the main data structures used in the Redis code base to implement a hash table. We will reimplement a simplified version of those, let’s start with the two small ones, DictEntry & HashTable:
module BYORedis
  class DictEntry

    attr_accessor :next, :value
    attr_reader :key

    def initialize(key, value)
      @key = key
      @value = value
      @next = nil
    end
  end
end
listing 6.10: The DictEntry class
module Redis
  class HashTable

    attr_reader :table, :size, :sizemask
    attr_accessor :used

    def initialize(size)
      @table = size == 0 ? nil : Array.new(size)
      @size = size
      @sizemask = size == 0 ? 0 : size - 1
      @used = 0
    end

    def empty?
      @size == 0
    end

    def each
      return unless @table

      @table.each
    end
  end
end
listing 6.11: The HashTable class
@table in HashTable will contain instances of DictEntry, which is our linked list implementation to handle collisions.
We could have defined DictEntry as a Struct, but the explicit class has one small benefit, it allows us to not define a setter for the key attribute.
As already discussed, because Ruby is Ruby, where most things are mutable, it does not mean that a key attribute will always be the same, but at least it prevents reassignment. The value can still be changed by updating the value in place:
dict_entry = BYORedis::DictEntry.new("a-key", "a-value") # => nil
dict_entry # => #<BYORedis::DictEntry:0x00007fd577a17c60 @key="a-key", @value="a-value", @next=nil>
dict_entry.key.gsub!("a", "A") # => "A-key"
dict_entry # => #<BYORedis::DictEntry:0x00007fd577a17c60 @key="A-key", @value="a-value", @next=nil>
dict_entry.key # => "A-key"
Let’s now create the main class, Dict:
require_relative './siphash'
require_relative './dict_entry'
require_relative './hash_table'

module BYORedis
  class Dict

    INITIAL_SIZE = 4
    MAX_SIZE = 2**63

    attr_reader :hash_tables

    def initialize
      @hash_tables = [ HashTable.new(0), HashTable.new(0) ]
      @rehashidx = -1
    end

    # ...
  end
end
listing 6.12: The Dict class
Our Dict class does not require any arguments, it is initialized with two empty hash tables, and a rehash index set to -1, indicating that it is not in a rehashing state. The rehashing index is used to keep track of the progress throughout rehashing. Its value will change from 0 to @hash_tables[0].size - 1 as we rehash the table, and reset to -1 when completed.
The first method we need to add to the Dict class is add, it will be used to add an element to a dictionary. This is needed for the SET command. This method always expects the called to check that the key is not already present and will fail if it finds a matching key.
# dict.rb
module BYORedis
  class Dict

    # ...

    def add(key, value)
      index = key_index(key)

      # Only happens if we didn't check the presence before calling this method
      return nil if index == -1

      rehash_step if rehashing?

      hash_table = rehashing? ? rehashing_table : main_table
      entry = hash_table.table[index]

      entry = entry.next while entry && entry.key != key

      if entry.nil?
        entry = DictEntry.new(key, value)
        entry.next = hash_table.table[index]
        hash_table.table[index] = entry
        hash_table.used += 1
      else
        raise "Unexpectedly found an entry with same key when trying to add #{ key } / #{ value }"
      end
    end
    alias []= add
  end
end
listing 6.13: The add method in the Dict class
The method is very similar to the pseudo code we looked at earlier in add_or_update_key_value_pair. We first obtain the index for the key, aka the location of the bucket the key should go into. We then perform a rehash step if we’re in rehashing state.
We select which table the key will end up in depending on whether or not we are in rehashing state. If we are, the key will be added to the rehashing table, otherwise it is added to the main table.
The next step is to inspect the bucket at the index position, if it is not empty we look through all the items in the bucket to check if one of the entries has the same key.
If we find an entry with the same key, we don’t need to create a new entry, we can just update the existing entry with the new value. The number of elements in the dictionary does not change.
On the other hand, if we didn’t find an entry with the same key, we need to create a new entry for the new key/value pair. First, we instantiate DictEntry with key & value, then we need to add it to the linked list.
There are essentially two valid options for us here, either append the element to the list or prepend it. Prepending to a linked list is a constant time operation O(1), whereas appending is proportional to the size of list, it is an O(n) operation. Let’s illustrate with an example, we’ll start by creating a list with three elements
entry1 = BYORedis::DictEntry.new(1, 'value-1') # => nil
entry2 = BYORedis::DictEntry.new(2, 'value-2') # => nil
entry3 = BYORedis::DictEntry.new(3, 'value-3') # => nil
entry1.next = entry2 # => nil
entry2.next = entry3 # => nil
entry1 # => #<BYORedis::DictEntry:0x00007fd57403dbc0 @key=1, @value="value-1", @next=#<BYORedis::DictEntry:0x00007fd577a3eb58 @key=2, @value="value-2", @next=#<BYORedis::DictEntry:0x00007fd5779c3d90 @key=3, @value="value-3", @next=nil>>>
Now that the list is created, let’s assume we only have a single variable for the list, list, which is equal to entry1 in the previous example, prepending a new node is done as follows:
new_entry = BYORedis::DictEntry.new(99, 'value-99') # => nil
new_entry.next = list # => nil
list = new_entry # => nil
list # => #<BYORedis::DictEntry:0x00007fd5779b8878 @key=99, @value="value-99", @next=#<BYORedis::DictEntry:0x00007fd57403dbc0 @key=1, @value="value-1", @next=#<BYORedis::DictEntry:0x00007fd577a3eb58 @key=2, @value="value-2", @next=#<BYORedis::DictEntry:0x00007fd5779c3d90 @key=3, @value="value-3", @next=nil>>>>
This process can be repeated regardless of the size of the list. On the other hand, to append an element, we first need to find the last element, here is how we do it:
new_entry = BYORedis::DictEntry.new(99, 'value-99') # => nil
current_entry = list # => nil
current_entry = current_entry.next while current_entry.next != nil # => nil
current_entry.next = new_entry # => nil
list # => #<BYORedis::DictEntry:0x00007fd57403dbc0 @key=1, @value="value-1", @next=#<BYORedis::DictEntry:0x00007fd577a3eb58 @key=2, @value="value-2", @next=#<BYORedis::DictEntry:0x00007fd5779c3d90 @key=3, @value="value-3", @next=#<BYORedis::DictEntry:0x00007fd5779b8878 ...>>>>
The third line iterates through all the elements in the list. The more elements, the longer it’ll take. Some linked list implementations work around this issue by always maintaining a pointer to the last element.
Back to our collision handling, even though appending has a worst time complexity compared to prepending, O(n) vs O(1), given that we need to iterate through all the items in the list anyway, to make sure the key does not already exist, we could have kept a variable pointing at the last element.
Redis chooses the prepend option with the assumption that it might be common for recently added items to be accessed more frequently. If this assumption holds true, future lookups would find the key/value pair early in the list, instead of having to iterate through the end of the list.
The lines entry.next = hash_table.table[index] & hash_table.table[index] = entry insert the new entry as the head of the list. The first one makes the new entry point at the old head of the list. If it was null, then the next value will still be null and the new entry will be the only element in the list. If it wasn’t null, then next in the new entry now points at the old head, which itself, points at the rest of the list. We’re not losing anything, great!
The second line is necessary so that the head of list in the bucket points at the new entry.
The last line, hash_table.used += 1, increments the counter of how many items are in the dictionary.
Finally, we use the Ruby alias keyword to create an alias for add to []=. This allows us to use a Dict instance similarly to how we use a Ruby Hash:
dict = Dict.new
# The following two are equivalent, the same method is called, Dict#add:
dict.set(1, 2)
dict[1] = 2
We used a few private methods that we should now look more closely at: main_table, rehashing_table & key_index
# dict.rb
module BYORedis
  class Dict

    # ...
    private

    def main_table
      @hash_tables[0]
    end

    def rehashing_table
      @hash_tables[1]
    end

    def key_index(key)
      expand_if_needed
      hash = SipHash.digest(RANDOM_BYTES, key)
      index = nil

      iterate_through_hash_tables_unless_rehashing do |hash_table|
        index = hash & hash_table.sizemask
        entry = hash_table.table[index]
        while entry
          # The key is already present in the hash so there's no valid index where to add it
          if entry.key == key
            return -1
          else
            entry = entry.next
          end
        end
      end

      index
    end

    # In the Redis codebase, they extensively use the following pattern:
    # for (table = 0; table <= 1; table++) {
    #   ...
    #   if (!dictIsRehashing(d)) break;
    # }
    # This is common for many operations, such as finding or deleting an item in the dict,
    # we first need to look at the main table, the first table, but we haven't found in the
    # first one, we should look in the rehashing table, the second one, but only if we're in
    # the process of rehashing.
    # Taking advantage of Ruby blocks, we can write this helper method instead
    def iterate_through_hash_tables_unless_rehashing
      @hash_tables.each do |hash_table|
        yield hash_table
        break unless rehashing?
      end
    end
  end
end
listing 6.14: helper methods in the Dict class
main_table and rehashing_table are used as aliases of @hash_tables[0] and @hash_tables[1]. key_index is used to return the index representing the location of the bucket for the given key. It first calls expand_if_needed, which we’ll explore in the next section about rehashing. Once the dictionary has been resized if needed, it computes the hash value using the SipHash class. The code for the siphash algorithm is available in Appendix B.
Once we obtained the hash value, we need to convert it to an index within the boundaries of the backing array, with the modulo operation, or as we discussed earlier, the bitwise AND operation. Before doing that, we need to take into account which table the bucket should go into, if we’re not in a rehashing state, it should go in the main table, if we are, it should go to the rehashing table.
This process of first inspecting the main table, and the rehashing table, only if we’re in rehashing state is so common that we added a helper method for that, iterate_through_hash_tables_unless_rehashing.
This method replaces the common pattern in the Redis C codebase using a for loop and a conditional break statement at the end of the first iteration. We instead leverage the Ruby block syntax to always yield back the main table to the caller, and only yield the rehashing table if we’re in a rehashing state.
The implication for key_index is that if we’re in a rehashing state, we’ll first find the index in the first table, but iterate_through_hash_tables_unless_rehashing will yield a second time and index will end up being an index for the rehashing table.
key_index is used to find the index of the bucket where a new entry should be added and it therefore does not make sense to return a value if an entry already exists with the same key. In such cases we’ll need to update the existing entry, which we’ll cover soon. This is necessary because of the rehashing process, which is explained below as well. In short, during rehashing, keys will be present in two different tables, the main one and the rehashing, and clearly separating the process of adding a new entry and updating an existing one allows to guarantees keys are unique.
The digest method in the SipHash class requires a 16-byte key composed of random bytes. Redis does generates these with the getRandomBytes function, which attempts to use /dev/urandom/ and defaults to a weaker seed based on the current time and the pid of the server if /dev/urandom is not accessible. Ruby’s SecureRandom module provides a random_bytes method which uses /dev/urandom under the hood, so let’s use it:
# server.rb
require 'socket'
require 'logger'
require 'strscan'
require 'securerandom'

LOG_LEVEL = ENV['DEBUG'] ? Logger::DEBUG : Logger::INFO
RANDOM_BYTES = SecureRandom.bytes(16)
# ...
listing 6.15: Initialization of the random byte in server.rb
Now that we implemented the set method, and its alias, []=, we need to add the get method, which will be used by the GET command, to retrieve an element from a dictionary based on its key.
module BYORedis
  class Dict

    def used
      main_table.used + rehashing_table.used
    end

    def get_entry(key)
      return if main_table.used == 0 && rehashing_table.used == 0

      rehash_step if rehashing?

      hash = SipHash.digest(RANDOM_BYTES, key)

      iterate_through_hash_tables_unless_rehashing do |hash_table|
        index = hash & hash_table.sizemask

        entry = hash_table.table[index]

        while entry
          return entry if entry.key == key

          entry = entry.next
        end
      end

      nil
    end

    def get(key)
      get_entry(key)&.value
    end
    alias [] get

    def include?(key)
      !get_entry(key).nil?
    end

    def each
      return if main_table.used == 0 && rehashing_table.used == 0

      start_index = rehashing? ? @rehashidx : 0
      main_table.table[start_index..-1].each do |bucket|
        next if bucket.nil?

        until bucket.nil?
          yield bucket.key, bucket.value
          bucket = bucket.next
        end
      end
      return unless rehashing?

      rehashing_table.each do |bucket|
        next if bucket.nil?

        until bucket.nil?
          yield bucket.key, bucket.value
          bucket = bucket.next
        end
      end
    end
  end
end
listing 6.16: get, include? and each method in Dict.rb
The get method is a small wrapper around the lower level get_entry method. This lower level method is necessary to support nil as values. Without it, calling dict.get(key) would return nil if the key is not present, but also if it is present, but the value is nil. With get_entry, we will only receive nil when the key is not present, and will receive an instance of DictEntry otherwise.
get_entry starts with an early return statement if both tables are empty. If that’s the case, there’s no need to continue, we know the key is not present in the table.
The next step is similar to add, we perform a single rehash step if we’re in a rehashing state. The approach allows Redis to incrementally work its way through the rehashing process, without affecting too much the performance of other operations. A single rehashing step does not require a lot of work, and will have a negligible impact on the performance of get, but it has the important benefits of advancing the rehashing process.
Once again, we follow a pattern similar to the pseudo code lookup_key from earlier in the chapter, we start by computing the hash value of the key. Once we have the hash value, we first need to look at the main table, and if we’re in a rehashing state, at the second table as well. We do this with the same helper method as previously, iterate_through_hash_tables_unless_rehashing. hash & hash_table.sizemask returns the location of the bucket for the key. There might be more than one item in the bucket, because of potential collisions, so we need to iterate through all of them and compare their key with the key argument. We do this with the while loop. If we do find a matching key, we abort early and return the value associated with that key.
If we inspected all the element in the main table bucket, and potentially in the rehashing table bucket, and did not find any matches, we return nil. The key is not in the hash table.
Similarly to what we did with add and []=, we alias get to [], which allows us to use the same syntax we use for Hash instances:
dict = Dict.new
# The following are equivalent, the same method is called:
dict.get(1)
dict[1]
There is a use case where we only care about the presence of a key in a dictionary, but not about the value, this is what the include? method does. We do not need to reimplement the logic, we reuse the get method, discard its value and return a boolean instead.
Now that we have the get_entry method, we can define the set method which performs the “add or update” operation, and update the []= alias to point at set and not at add anymore.
module BYORedis
  class Dict
    # ...
    def set(key, value)
      entry = get_entry(key)
      if entry
        entry.value = value
      else
        add(key, value)
      end
    end
    alias []= set
    # ...
  end
end
listing 6.17: The set method in Dict.rb aliased to []=
Finally we add the each method, which will yield all the key/value pairs in the hash table. This time we do not use the iterate_through_hash_tables_unless_rehashing. This is because we’re using a small optimization technique to avoid iterating over buckets we know are empty.
If we are in rehashing state, then we know that all buckets between 0 and the value in @rehashidx excluded have been rehashed and the values are empty. In a table of size 16, if @rehashidx is set to 5, it means that the buckets at index 0, 1, 2, 3 & 4 have been migrated and we don’t need to inspect them.
For the rehashing table, we iterate through the backing array with the each method on HashTable, which itself delegates each to its Array instance. There is no need to yield back empty buckets, so we continue to the next bucket if we find an empty one. For each non empty bucket, we iterate through the linked list of entries and yield all of them.
Resizing and rehashing
When Dict is initialized, it creates two instances of HashTable, each with an empty array. We need to implement the rehashing mechanism to allow the tables to grow and shrink as needed. The add method we discussed in the previous section starts by calling expand_if_needed:
# dict.rb
module BYORedis
  class Dict

    INITIAL_SIZE = 4
    # ...

    def expand_if_needed
      return if rehashing?

      if main_table.empty?
        expand(INITIAL_SIZE)
      elsif main_table.used >= main_table.size
        expand(main_table.used * 2)
      end
    end
    # ...
  end
end
listing 6.18: expand_if_needed in the Dict class
If we are already in the process of rehashing the dict, then we can abort early, the process will continue incrementally, there’s nothing else we should do until rehashing is over.
If the table is empty we call expand with INITIAL_SIZE, which is set to 4, otherwise we call it with a capacity set to twice the current size of the dictionary.
Note that the used member can be greater than the size member. size determines the size of the array in the hash table, in other words how many buckets are in the table, and each bucket can contain more than one value because it uses a linked list to store elements. This means that we might increase by more than twice the current size, since we rely on the number of items in the dict, not the current size, to determine the new size.
Let’s now take a look at the expand method:
# dict.rb
def expand(size)
  return if rehashing? || main_table.used > size

  real_size = next_power(size)

  return if real_size == main_table.size

  new_hash_table = HashTable.new(real_size)

  # Is this the first initialization? If so it's not really a rehashing
  # we just set the first hash table so that it can accept keys.
  if main_table.table.nil?
    @hash_tables[0] = new_hash_table
  else
    @hash_tables[1] = new_hash_table
    @rehashidx = 0
  end
end

def next_power(size)
  # Ruby has practically no limit to how big an integer can be, because under the hood the
  # Integer class allocates the necessary resources to go beyond what could fit in a 64 bit
  # integer.
  # That being said, let's still copy what Redis does, since it makes sense to have an
  # explicit limit about how big our Dicts can get
  i = INITIAL_SIZE
  return MAX_SIZE if size >= MAX_SIZE

  loop do
    return i if i >= size

    i *= 2
  end
end

def rehashing?
  @rehashidx != -1
end
listing 6.19: expand, next_power and rehashing? methods in the Dict class
Similarly to resize, if we’re already in the process of rehashing, we can abort early. We also abort early if the number of items in the array is greater than the new size. In this case, there’s no point in resizing the table, it would be too small.
We use the next_power method to find the next power of two that is greater or equal to the new size. This method is used to maintain the size of the array as of power of two to leverage the bitwise AND operation to compute a modulo.
We then perform another sanity check, if the “real size”, the power of two, is equal to the current size, then there’s no point in going through a rehashing process, the table is already at the desired size.
Now that we performed all the checks, we create a new hash table of the desired size and make it the rehashing table by assigning it to @hash_tables[1]. We do have to consider the case where this is the first call to expand, in which case both tables are empty, and there’s nothing to rehash so we directly assign the newly created hash table to the main table, @hash_tables[0].
If there are elements to rehash, we flag the dict as being in a rehashing state by setting @rehashidx to 0. This instance variable acts as a pointer to the next element that should be rehashed in the main table. By being different than -1, the dict is now considered in rehashing state. This is what the rehashing? method does.
In the case where there are elements to rehash, the expand method does not actually rehash any of them. It only prepares the dictionary for rehashing. The actual rehashing is performed in two different places.
Many operations, such as set and get, will perform a single rehashing step before performing the rest of the operation. The other place where rehashing happens is through the server_cron time event we discussed in Chapter 3.
# dict.rb
def rehash_step
  rehash(1)
end

def rehash(n)
  empty_visits = n * 10
  return 0 unless rehashing?

  while n > 0 && main_table.used != 0
    n -= 1
    entry = nil

    while main_table.table[@rehashidx].nil?
      @rehashidx += 1
      empty_visits -= 1
      return 1 if empty_visits == 0
    end

    entry = main_table.table[@rehashidx]

    while entry
      next_entry = entry.next
      idx = SipHash.digest(RANDOM_BYTES, entry.key) & rehashing_table.sizemask

      entry.next = rehashing_table.table[idx]
      rehashing_table.table[idx] = entry
      main_table.used -= 1
      rehashing_table.used += 1
      entry = next_entry
    end
    main_table.table[@rehashidx] = nil
    @rehashidx += 1
  end

  # Check if we already rehashed the whole table
  if main_table.used == 0
    @hash_tables[0] = rehashing_table
    @hash_tables[1] = HashTable.new(0)
    @rehashidx = -1
    0
  else
    # There's more to rehash
    1
  end
end
listing 6.20: rehashing related methods in the Dict class
rehash_step calls rehash with the parameter 1. The parameter to rehash dictates how many items it will rehash, that is, move from the main table to the rehashing one. Let’s look at the method one line at a time.
We start by initializing the empty_visits variables to n * 10. n, the method parameter is the number of elements we want to move to the rehashing table. Because of the nature of a hash table, when iterating through the buckets, from the one at index 0 until the one at index size - 1, we don’t know how many empty buckets we’ll find. In order to prevent any potential slowness in the rehashing process, Redis uses an upper bound for the number of empty visits.
This is especially important when reducing the size of a hash table, which we’ll explore next. In this case the table we’re rehashing might be very scarcely populated and there might be many consecutive empty buckets. By using empty_visits, we ensure that the rehashing step has a known upper bound.
The next step is a sanity check, if we are not rehashing, we should exit right away, there’s nothing else to do. Note that we’re using the same semantics as Redis here, a return value of 0 indicates that all elements are rehashed, 1 indicates that there are more elements to rehash.
The while loop is the main piece of the method, it iterates as long a n is greater than 0 and as long as there are items left in the main table. The second part of the condition is a quick shortcut we attempt to take at the end of the rehashing process. After rehashing the last element in the main table, there might still be a few extra empty buckets in the array, but since we know the table does not have any more elements left by looking at the used variable, we stop instead of iterating through the last empty buckets.
The first step of the loop is to decrement n, this is a very important part of the loop that dictates the number of iterations. We also initialize an entry variable that will be used to iterate through the entries of a bucket.
@rehashidx is initialized at 0 when the rehashing process starts, so we use it as the index to look through the buckets in the main table. As long as we find empty buckets, we increment the empty_visits variable and increment @rehashidx to keep moving along in the main table. If empty_visits reaches 0, we stop the rehashing process, we’re already spent too much time iterating through empty buckets. Note that the next call to rehash will be able to continue where we left off since it will use @rehashidx.
This inner while loop will stop as soon as we encounter a non empty bucket, and we set entry to the first entry of the bucket when that happens. As we already established, we might be dealing with more than one entries, so we use another inner while loop to iterate through all the entries in the linked list.
For each of these entries, we first store the following entry in the next_entry variable and then compute the index of the entry in the rehashing table.
The next few lines perform the actual move of the entry from one table to the other, similarly to how we inserted an entry in the add method earlier. We make the next attribute of the entry variable point at the bucket in the rehashing table with entry.next = rehashing_table.table[idx]. This might either set the value to nil if the bucket in the rehashing table was empty, or would otherwise be the head of the list if it was not empty.
rehashing_table.table[idx] = entry is taking care of making the bucket in the rehashing table point at the entry variable, making it the new head of the list.
We then decrement used in the main table and increment it in the rehashing table.
Finally, in order to keep iterating through the entries in the bucket from the main table, we set entry to next_entry, which will repeat these steps with the next entry in the list.
Once we’ve moved all the entries in the bucket, one rehashing step is completed, we explicitly empty the bucket with main_table.table[@rehashidx] = nil and increment @rehashidx so that the next iteration of the outer while loop continues iterating through the main table.
Once n rehashing steps have been performed, we check a few final details. If used reached 0 in the main table, we’re done with the rehashing process, the main table is empty. We set @hash_tables[0] to the new rehashing table, effectively promoting it from rehashing table to main table, and reset the rehashing table to an empty table. Resetting @rehashidx to -1 marks the end of the rehashing process.
We return 1 otherwise, indicating that the rehashing process is not done.
The use of rehash_step makes sure that rehashing keeps happening, one step at a time, but large tables might require many rehash steps, up to millions of steps. Redis uses the server_cron time event to perform rehashing in larger steps, in order to speed up the rehashing process. This is especially useful if the server is idle for a while. If Redis would only perform rehashing steps when receiving commands, it would not make any progress while idle. This approach prevents this and takes advantage of the idle time to do so cleanup work.
Let’s add a call to a new method, databases_cron in server_cron in server.rb:
# server.rb

def server_cron
  # ...

  databases_cron

  1000 / DEFAULT_FREQUENCY
end

def databases_cron
  @data_store.resize if ht_needs_resize(@data_store)
  @expires.resize if ht_needs_resize(@expires)

  @data_store.rehash_milliseconds(1)
  @expires.rehash_milliseconds(1)
end

def slots(dict)
  dict.hash_tables[0].size + dict.hash_tables[1].size
end

def size(dict)
  dict.hash_tables[0].used + dict.hash_tables[1].used
end

def ht_needs_resize(dict)
  size = slots(dict)
  used = size(dict)

  size > Dict::INITIAL_SIZE && ((used * 100) / size < HASHTABLE_MIN_FILL)
end
listing 6.21: databases_cron method in the Server class
databases_cron performs two operations on the two dictionaries in the Server class, @data_store, that holds all the key/value pairs, and @expires which keeps track of the keys with TTLs. For each of these dictionaries, if first calls resize, which we’ve explored in the previous section, only if it thinks the dictionary needs to be resized.
A dictionary needs to be resized if the number of items in the dictionary is less than 10% of the size of the dictionary. Beside the EX & PX options, we have not yet implemented commands to delete keys, such as the DEL command, but we will soon. Once the DEL command is implemented, key/value pairs can be removed from a dictionary, meaning that a dictionary that grew to a given size might become too big at some point. Let’s look at an example:
dict = BYORedis::Dict.new
dict.hash_tables[0].size # => 0
dict.hash_tables[1].size # => 0
dict.add("1", "2") # => 1
dict.hash_tables[0].size # => 4
# We're calling to_s because Dict only works with strings and i is an Integer
100.times { |i| dict.add(i.to_s, i.to_s) } # => 100
dict.hash_tables[0].size # => 128
In the previous examples, the main table grew to a size of 128, if we were to delete all items but one, we would end up with only one non empty bucket, while the other 127 would be empty.
With small values like those it might not seem like a big difference, but as we saw earlier, Redis’ dict can grow to billions of keys, so efficiently using memory is important.
If the dictionaries need resizing, calling resize will find a good size for the dictionary and start the rehashing process.
The next step is to call rehash_milliseconds. We’ve already explained why it’s important for Redis to maintain an upper bound to all the operations that blocks other clients in the queue. By calling rehash_milliseconds(1), Redis tries to do as much rehashing as possible and stops once one millisecond has elapsed. This means that in the most pessimistic scenario possible, a client would send a command right after Redis enters the rehash_milliseconds(1) call, effectively blocking this client for at least one millisecond. This behavior is considered acceptable by Redis, but it can be disabled through the activerehashing config value. We have not yet implemented any form of configuration so we will assume that all clients of our server are ok with this behavior.
# dict.rb
def rehash_milliseconds(millis)
  start = Time.now.to_f * 1000
  rehashes = 0
  while rehash(100) == 1
    rehashes += 100
    time_elapsed = Time.now.to_f * 1000 - start

    break if time_elapsed > millis
  end
  rehashes
end

def resize
  return if rehashing?

  minimal = main_table.used
  minimal = INITIAL_SIZE if minimal < INITIAL_SIZE

  expand(minimal)
end
listing 6.22: rehash_milliseconds and resize methods in the Dict class
No more Hash & {}
Equipped with our Dict class, we can now remove all instances of Hash and replace them with Dict. We lose a little bit syntax wise, we cannot use the Hash literal syntax with { key: value }, but overall, things are not that different:
# server.rb
module BYORedis
  class Server

    COMMANDS = Dict.new
    COMMANDS.set('command', CommandCommand)
    COMMANDS.set('del', DelCommand)
    COMMANDS.set('get', GetCommand)
    COMMANDS.set('set', SetCommand)
    COMMANDS.set('ttl', TtlCommand)
    COMMANDS.set('pttl', PttlCommand)
    # ...

    def initialize
      @logger = Logger.new(STDOUT)
      @logger.level = LOG_LEVEL

      @clients = []
      @data_store = Dict.new
      @expires = Dict.new

      # ...
    end

    # ...
  end
end
listing 6.23: Replacing usages of Hash with Dict in the Server class
The SetCommand class was using a Hash to store the configuration values of the possible options. We replace it similarly to what we did for the COMMANDS constant in server.rb:
# set_command.rb
module BYORedis
  class SetCommand
    OPTIONS = Dict.new
    OPTIONS.set(
      'ex',
      CommandOptionWithValue.new(
        'expire',
        ->(value) { validate_integer(value) * 1000 },
      )
    )
    OPTIONS.set(
      'px',
      CommandOptionWithValue.new(
        'expire',
        ->(value) { validate_integer(value) },
      )
    )
    OPTIONS.set(
      'xx', CommandOption.new('presence')
    )
    OPTIONS.set(
      'nx', CommandOption.new('presence')
    )
    OPTIONS.set(
      'keepttl', CommandOption.new('expire')
    )

    # ...
    def initialize(data_store, expires, args)
      # ...
      @options = Dict.new
    end
    # ...
  end
end
listing 6.24: Replacing usages of Hash with Dict in the SetCommand class
Changing @clients to a Dict
Up until now the @clients in the Server class was an Array, which worked fine for small list of clients but would be problematic for largest lists of clients. When we process the results of IO.select, we use the returned sockets to find the matching clients within the connected clients. This is an O(n) operation with an array. We can use our new Dict class to turn it into an O(1) operation. It’s worth nothing that the performance will be worse for a small number of clients given the overhead of the Dict class, but the performance won’t change regardless of the number of connected clients.
Each socket has a fileno which returns the numeric file descriptor of the socket. This number will be different for each socket and we can therefore use it as a key to identify sockets in the Dict.
module BYORedis
  class Server
    # ...
    Client = Struct.new(:socket, :buffer, :blocked_state) do
      attr_reader :id

      def initialize(socket)
        @id = socket.fileno.to_s
        self.socket = socket
        self.buffer = ''
      end
    end
    # ...
    def initialize
      @logger = Logger.new(STDOUT)
      @logger.level = LOG_LEVEL

      @clients = Dict.new
      # ...
    end
    # ...
    def client_sockets
      sockets = []
      @clients.each { |_, client| sockets << client.socket }
      sockets
    end
    # ...
    def process_poll_events(sockets)
      sockets.each do |socket|
        begin
          if socket.is_a?(TCPServer)
            socket = @server.accept

            @clients[socket.fileno.to_s] = Client.new(socket)
          elsif socket.is_a?(TCPSocket)
            client = @clients[socket.fileno.to_s]
            client_command_with_args = socket.read_nonblock(1024, exception: false)
            if client_command_with_args.nil?
              @clients.delete(socket.fileno.to_s)
              socket.close
            elsif client_command_with_args == :wait_readable
              # There's nothing to read from the client, we don't have to do anything
              next
            elsif client_command_with_args.empty?
              @logger.debug "Empty request received from #{ socket }"
            else
              # ...
            end
          else
            raise "Unknown socket type: #{ socket }"
          end
        rescue Errno::ECONNRESET
          @clients.delete(socket.fileno.to_s)
        rescue IncompleteCommand
          # Not clearing the buffer or anything
          next
        rescue ProtocolError => e
          socket.write e.serialize
          socket.close
          @clients.delete(socket.fileno.to_s)
        end
      end
    end
    # ...
  end
end
Adding the DEL command
As mentioned earlier in this chapter, the only option we currently have for keys to be deleted is to set them with a TTL with the EX & PX options. It will be more convenient to manually test the behavior of our new Dict class with a more explicit option. The DEL command is very useful in that aspect, it accepts one or more keys as its arguments and attempts to delete them. It returns an integer representing the number of keys that were deleted:
module BYORedis
  class DelCommand

    def initialize(data_store, expires, args)
      @data_store = data_store
      @expires = expires
      @args = args
    end

    def call
      if @args.empty?
        RESPError.new("ERR wrong number of arguments for 'GET' command")
      else
        keys = @args
        deleted_count = 0
        keys.each do |key|
          entry = @data_store.delete(key)
          if entry != nil
            # If there was a key, then we need to delete its TTL if it had one:
            @expires.delete(key)
            deleted_count += 1
          end
        end

        RESPInteger.new(deleted_count)
      end
    end

    def self.describe
      [
        'del',
        -2, # arity
        # command flags
        [ RESPSimpleString.new('write') ],
        1, # position of first key in argument list
        -1, # position of last key in argument list
        1, # step count for locating repeating keys
        # acl categories: https://github.com/antirez/redis/blob/6.0.0/src/server.c#L161-L166
        [ '@keyspace', '@write', '@slow' ].map { |s| RESPSimpleString.new(s) },
      ]
    end
  end
end
listing 6.25: The new DelCommand class
The DelCommand class implements the behavior of the command, as well as defining the data for the COMMAND command, but it mainly relies on a non existing method on the Dict class, delete. Let’s add it:
# dict.rb
def delete(key)
  return if main_table.used == 0 && rehashing_table.used == 0

  rehash_step if rehashing?

  hash_key = SipHash.digest(RANDOM_BYTES, key)
  iterate_through_hash_tables_unless_rehashing do |hash_table|
    index = hash_key & hash_table.sizemask
    entry = hash_table.table[index]
    previous_entry = nil

    while entry
      if entry.key == key
        if previous_entry
          previous_entry.next = entry.next
        else
          hash_table.table[index] = entry.next
        end
        hash_table.used -= 1
        return entry
      end
      previous_entry = entry
      entry = entry.next
    end
  end
end
listing 6.26: The delete method in the Dict class
The logic in delete is similar to the add method. We start with a shortcut we’ve already seen, if the table is empty, there’s no need to go any further, we can stop right there.
We perform a rehashing step if needed, to keep the rehashing process moving and then we get the hash value for the key. The key we’re attempting to delete might be in the main table or the rehashing table, so we use our helper method iterate_through_hash_tables_unless_rehashing to help with this.
For each hash table we look at, we obtain the index and inspect the bucket at that location. If the bucket is empty, then there’s nothing else to do, the key is not present in this table. If the bucket is not empty, we need to iterate through all the entries and compare the keys of these entries with the method argument. If there’s a match we found the entry we need to delete, this is what the while loop is doing.
If there is a match, the if entry.key == key condition, we need to handle two cases, whether or not the entry we want to delete is the first entry in the bucket. We use the previous_entry variable to keep track of the previous entry as we iterate through the entry list in the bucket. Once we find a match, this allows us to know if the entry we’re trying to delete was the first one or not, if previous_entry is nil, then it is the first one.
In this case the deleting process is to make the head of the bucket, hash_table.table[index], point at the next element in the list. If entry was the only element, its next value would be nil, and the bucket would now be empty. If entry was the head of list with more than one element, then the bucket now starts with what was the second element in the list, the entry which next is to in entry.
If previous_entry is not nil, then entry is not at the head of the list and the deletion process requires us to change previous_entry.next to now skip over entry since we want to remove it from the list, and point to the entry in entry.next. This entry might be nil or not, and it does not matter to us. If it was nil, then it means that entry was the last element in the list, and by changing previous_entry.next to nil, previous_entry is now the last entry. If it wasn’t nil, then previous_entry now points to the element entry is pointing to, and no entries point at entry anymore, it’s now floating on its own and is not part of the list anymore.
In a language with manual memory management, such as C, we would also need to explicitly free the memory, but we’re in Ruby, so we’ll let the garbage collector do its job.
Whether or not the entry was the first one in the bucket, it’s now deleted, we decrement the used counter and return.
Conclusion
In this chapter we dived into hash tables, how Redis uses them and how to implement one in Ruby, in order to replace the Hash class.
In the next Chapter we will add new commands to handle a new data type, Lists. See you there.
Appendix A: Array from scratch in Ruby
This implementation use the fiddle gem which is packaged alongside Ruby. Fiddle provides an interface to libffi, which is a C library that allows code in one language to call code in another language. Here we use the Fiddle::Pointer class with the malloc method to explicitly allocate memory.
This implementation only works with strings and does not support resizing.
PTR_SIZE is constant set to ::Fiddle::SIZEOF_LONG, which is 8 on most modern machines. This size is in bytes, and since a byte holds 8 bits, we can see that a long is 64 bits here.
When initialized, we call Fiddle::Pointer.malloc(PTR_SIZE * size) to allocate enough memory to store n pointers, where n is the given size.
Adding an element, beside the sanity checks around the size and the type requires the following step:
- We obtain a pointer to the given string with
Pointer.to_ptr(str) - We compute the location of the next element in the array and save it in
offset. If the array is empty it’s gonna be0, if there’s one element, it’ll be8, etc … - We use the
[]=notation of thePointerclass to write the 8 bytes representing the address of the given string, which is what the value ofptr.ref. This is similar to the&operator used to return the address of variable. - We increment the size by one.
The get method is similar, we transform the index to an offset by multiplying it by the size of a pointer, 8. And we read a whole pointer, 8 bytes, from there, with the [] method of the Pointer class.
We use .unpack('Q') on the result because the [] method of Pointer returns a string of 8 bytes, representing the 64-bit integer holding the address of the string stored in the array. But we need the actual integer value, to pass to Pointer.new, and that’s what unpack('Q') does, it “unpacks” the string to a long long, a 64-bit integer, and returns that as an array, so we grab the first element with [0].
to_s on Pointer is smart enough to read all the bytes until it finds a null byte and return the result as a Ruby string, great, so we don’t have to deal with that!
require 'fiddle'

class BYOArray < BasicObject

  PTR_SIZE = ::Fiddle::SIZEOF_LONG

  def initialize(max_size)
    @max_size = max_size
    @current_size = 0
    @beginning_address = ::Fiddle::Pointer.malloc(PTR_SIZE * max_size)
  end

  def add(str)
    ::Kernel.raise 'Array is full' if @current_size == @max_size
    ::Kernel.raise 'Expected a string' unless str.is_a?(::String)

    ptr = ::Fiddle::Pointer.to_ptr(str)
    offset = @current_size * PTR_SIZE # 0 at first, then 8, 16, etc ...

    @beginning_address[offset, PTR_SIZE] = ptr.ref

    @current_size += 1
    self
  end

  def get(i)
    return nil if i < 0 || i >= @current_size

    address = @beginning_address[i * PTR_SIZE, PTR_SIZE].unpack('Q')[0]
    ::Fiddle::Pointer.new(address).to_s
  end

  def to_s
    "Size: #{ @current_size }"
  end
end
listing 6.27: A Ruby implementation of an Array structure
ary = BYOArray.new(2)
::Kernel.puts ary.add("foo")
::Kernel.puts ary.add("bar")

::Kernel.puts ary.get(0)

::Kernel.puts ary.get(1)
::Kernel.puts ary.get(2)
::Kernel.puts ary.add("bar")
Note that this is a very very rough sketch of how Fiddle can be used to allocate memory from Ruby in an array-like manner. Among probably other issues, a huge problem with this implementation is that the memory allocated in the constructor is never de-allocated. Fiddle exposes a free method, but since Ruby objects are deallocated by the Garbage Collector, it is non-trivial to figure out how and when to call free. The ObjectSpace module has a define_finalizer method which can be used to define a proc that will be called when the object is garbage collected. This StackOverflow answer shows an example of how it can be used:
class MyClass
  def initialize
    ObjectSpace.define_finalizer(
      self,
      self.class.method(:finalize).to_proc
    )
  end

  def MyClass.finalize(id)
    puts "Object #{id} dying at #{Time.new}"
  end
end
listing 6.28: Using define_finalizer to register a callback on object destruction
Appendix B: A Ruby implementation of SipHash
The following is adapted from the siphash gem. The gem implements the 2-4 version, and the version below implements the same one Redis uses, 1-2. These two numbers, named c & d in the siphash paper represent the number of compression steps and finalization steps. Variants with higher number of compression and finalization steps are supposed to provide a higher security at the cost of being slower. The following is a quote from the Redis implementation:
We use SipHash 1-2. This is not believed to be as strong as the suggested 2-4 variant, but AFAIK there are not trivial attacks against this reduced-rounds version, and it runs at the same speed as Murmurhash2 that we used previously, why the 2-4 variant slowed down Redis by a 4% figure more or less.
# Credit to https://github.com/emboss/siphash-ruby/blob/master/lib/siphash.rb
class SipHash

  # Ruby's Integer class allows numbers by going passed the max value of a 64 bit integer,
  # by encoding the value across multiple 64-bit integers under the hood. In order to make
  # sure that the values we deal with stay within the 64-bit range, we use the following
  # constant as the right operand of an AND bitwise operation
  MASK_64 = 0xffffffffffffffff

  def self.digest(key, msg, compress_rounds: 1, finalize_rounds: 2)
    new(key, msg, compress_rounds, finalize_rounds).digest
  end

  def initialize(key, msg, compress_rounds, finalize_rounds)
    @msg = msg
    @compress_rounds = compress_rounds
    @finalize_rounds = finalize_rounds

    # These are the four 64-bit integers of internal state. The initial values are based on the
    # arbitrary string: "somepseudorandomlygeneratedbytes"
    # "somepseu".split('').map(&:ord).map { |b| b.to_s(16) }.join # => "736f6d6570736575"
    # The 64-bit value is 8317987319222330741, its binary representation is:
    # 0111 0011 0110 1111 0110 1101 0110 0101 0111 0000 0111 0011 0110 0101 0111 0101
    # Which we can obtain with
    # "736f6d6570736575".scan(/../).map { |h| h.hex } # => [115, 111, 109, 101, 112, 115, 101, 117]
    # [115, 111, 109, 101, 112, 115, 101, 117].pack('c8') # => "somepseu"
    # "somepseu".unpack('Q>') # => 8317987319222330741
    # '%064b' % 8317987319222330741 # =>
    # 0111 0011 0110 1111 0110 1101 0110 0101 0111 0000 0111 0011 0110 0101 0111 0101
    #
    # Note that we used 'Q>' which tells unpack to assume big-endianness. Using the default of
    # Q< would have returned the same 8 bytes but in the opposite order, from right to left:
    # "somepseu".unpack('Q<') # => 8459294401660546931
    # '%064b' % 8459294401660546931 # =>
    # 0111 0101 0110 0101 0111 0011 0111 0000 0110 0101 0110 1101 0110 1111 0111 0011
    # These are the same bytes but in different order, the character s is the following 8 bits:
    # ('%08b' % 's'.ord).scan(/..../).join(' ') # => "0111 0011"
    # And the character o is:
    # ('%08b' % 'o'.ord).scan(/..../).join(' ') # => "0110 1111"
    #
    # We can see that in the big endian version, these two bytes are on the left side, and
    # they're on the right side with the little endian version
    #
    # "dorandom".split('').map(&:ord).map { |b| b.to_s(16) }.join # => "646f72616e646f6d"
    # "lygenera".split('').map(&:ord).map { |b| b.to_s(16) }.join # => "6c7967656e657261"
    # "tedbytes".split('').map(&:ord).map { |b| b.to_s(16) }.join # => "7465646279746573"
    @v0 = 0x736f6d6570736575
    @v1 = 0x646f72616e646f6d
    @v2 = 0x6c7967656e657261
    @v3 = 0x7465646279746573

    # The key argument is a 16 byte string, which we want to unpack to two 64-bit integers.
    # A byte contains 8 bits, so one 64-bit integer is composed of 8 bytes, and one 16 byte
    # string can be unpacked to two 64-bit integers.
    # The first line grabs the first 8 bytes with the slice method, and calls unpack with the
    # Q< argument. Q means that Ruby will attempt to unpack as a long, and < is the explicit
    # way of telling it to unpack it as little endian, which is the default on many modern CPUs
    k0 = key.slice(0, 8).unpack('Q<')[0]
    # This line does the same thing with the last 8 bytes of the key
    k1 = key.slice(8, 8).unpack('Q<')[0]

    # The ^ Ruby operator is the XOR bitwise operation, a ^= b is equivalent to a = a ^ b
    # These four lines initialize the four 64-bit integers of internal state with the two
    # parts of the secret, k0 and k1
    @v0 ^= k0
    @v1 ^= k1
    @v2 ^= k0
    @v3 ^= k1
  end

  def digest
    iter = @msg.size / 8

    # Compression step
    iter.times do |i|
      m = @msg.slice(i * 8, 8).unpack('Q<')[0]
      compress(m)
    end

    # Compression of the last characters
    m = last_block(iter)
    compress(m)

    # Finalization step
    finalize

    # Digest result
    @v0 ^ @v1 ^ @v2 ^ @v3
  end

  private

  # This function might look a little bit complicated at first, it implements this section of
  # the compression part of paper, 2.2:
  # where m w-1 includes the last 0 through 7 bytes of m followed by null bytes and ending with a
  # byte encoding the positive integer b mod 256
  def last_block(iter)
    # We initialize last as a 64-bit integer where the leftmost byte, the 8 bits to the left are
    # set to the length of the input. 8 bits can only encode a value up to 255, so if the length
    # is more than 255, the extra bites are discarded, for a length of 11, last would look like
    # 0000 1011 0000 0000 0000 0000 0000 0000 0000 0000 0000 0000 0000 0000 000 00000
    # 11 is encoded as 1011 as binary, calling << 56 on it pushes it 56 bits to the left
    last = (@msg.size << 56) & MASK_64

    left = @msg.size % 8
    off = iter * 8

    # At this point, we've applied the compress step to all the 8 byte chunks in the input
    # string, but if the length was not a multiple of 8, there might be between 1 & 7 more bytes
    # we have not compressed yet.
    # For instance, if the string was 'hello world', the length is 11. The digest method would
    # have computed an iter value of 1, because 11 / 8 => 1, and called compress once, with the
    # first 8 bytes, obtained with the slice method, 'hello world'.slice(0, 8) => 'hello wo'
    # We still need to compress the last 3 bytes, 'rld'
    # In this example, left will be 3, and off 8
    # Note that this case/when statement is written to optimize for readability, there are ways
    # to express the same instructions with less code
    case left
    when 7
      last |= @msg[off + 6].ord << 48
      last |= @msg[off + 5].ord << 40
      last |= @msg[off + 4].ord << 32
      last |= @msg[off + 3].ord << 24
      last |= @msg[off + 2].ord << 16
      last |= @msg[off + 1].ord << 8
      last |= @msg[off].ord
    when 6
      last |= @msg[off + 5].ord << 40
      last |= @msg[off + 4].ord << 32
      last |= @msg[off + 3].ord << 24
      last |= @msg[off + 2].ord << 16
      last |= @msg[off + 1].ord << 8
      last |= @msg[off].ord
    when 5
      last |= @msg[off + 4].ord << 32
      last |= @msg[off + 3].ord << 24
      last |= @msg[off + 2].ord << 16
      last |= @msg[off + 1].ord << 8
      last |= @msg[off].ord
    when 4
      last |= @msg[off + 3].ord << 24
      last |= @msg[off + 2].ord << 16
      last |= @msg[off + 1].ord << 8
      last |= @msg[off].ord
    when 3
      # In the example documented above, this is the branch of the case/when we would
      # end up in. last is initially set to:
      # 0000 1011 0000 0000 0000 0000 0000 0000 0000 0000 0000 0000 0000 0000 000 00000
      # @msg[off + 2] is the character d, calling ord returns its integer value, 100
      # We shift it 16 bits to the left, effectively inserting as the 6th byte starting
      # from the left, or third from the right:
      # 0000 1011 0000 0000 0000 0000 0000 0000 0000 0000 0110 0100 0000 0000 0000 0000
      last |= @msg[off + 2].ord << 16
      # @msg[off + 1]is the character l, ord returns 108, and we insert it as the 7th byte
      # from the left, or second from the right:

      last |= @msg[off + 1].ord << 8
      # Finally, @msg[off] is the character r, with the ord value 100, and we insert it as the
      # byte from the left, or first from the right:
      # 0000 1011 0000 0000 0000 0000 0000 0000 0000 0000 0110 0100 0110 1100 0111 0010
      last |= @msg[off].ord
    when 2
      last |= @msg[off + 1].ord << 8
      last |= @msg[off].ord
    when 1
      last |= @msg[off].ord
    when 0
      last
    else
      raise "Something unexpected happened with the r value: #{ r }, should be between 0 & 7"
    end

    # Last is now a 64 bit integer containing the length of the input and the last bytes, if any:
    last
  end

  # rotl64 is the left rotation, also called circular shift:
  # https://en.wikipedia.org/wiki/Circular_shift
  def rotl64(num, shift)
    ((num << shift) & MASK_64) | (num >> (64 - shift))
  end

  # This is the main step of the siphash algorithm. A big difference with the C implementation
  # in the Redis codebase is the use of & MASK_64. As explained above, it is used to apply an
  # upper bounds to the results as Ruby would allow them to go past the max value of 64-bit
  # integer: 2^64 - 1
    def sip_round
    @v0 = (@v0 + @v1) & MASK_64
    @v2 = (@v2 + @v3) & MASK_64
    @v1 = rotl64(@v1, 13)
    @v3 = rotl64(@v3, 16)
    @v1 ^= @v0
    @v3 ^= @v2
    @v0 = rotl64(@v0, 32)
    @v2 = (@v2 + @v1) & MASK_64
    @v0 = (@v0 + @v3) & MASK_64
    @v1 = rotl64(@v1, 17)
    @v3 = rotl64(@v3, 21)
    @v1 ^= @v2
    @v3 ^= @v0
    @v2 = rotl64(@v2, 32)
  end

  def compress(m)
    @v3 ^= m
    @compress_rounds.times { sip_round }
    @v0 ^= m
  end

  def finalize
    @v2 ^= 0xff
    @finalize_rounds.times { sip_round }
  end
end
listing 6.29: A Ruby implementation of the siphash 1-2 algorithm
Liked what you read? Consider subscribing to stay updated!
And if you feel extra generous, consider donating!